이 글을 포스팅하게 된 배경
Apple Developer Academy의 Mini Challenge 2에서 만든 앱, 첫 심사가 무사히 통과되어 앱스토어에 올라가긴 하였으나..
업데이트를 하려 다시 심사를 넣으니 통과하지 못했다.
이유는 계정 삭제(회원 탈퇴) 기능을 넣어야 한다는 것.

회원 탈퇴 기능을 넣지 않고, 로그인 기능만 구현하고 앱스토어에 심사를 넣었다면 모두가 언제나 겪을 일.
그 중 애플 로그인 기능에 대한 회원 탈퇴는 쉽지는 않아 보였다.
첫 로그인 이후 이메일 값을 뱉지도 않고..
대충 생각해 봐도 탈퇴시키려면, 애플 계정 자체에서 'Apple로 로그인(Apple ID를 사용하는 앱)' 항목에서 삭제 처리를 하고, Firebase Auth에서 계정 정보를 삭제하고, FireStore에 저장된 그 계정에 관련된 정보들을 싹 삭제해줘야 함.
그런데 구글링해봐도, Firebase를 이용해 애플 로그인을 구현하는 방법에 대해서는 여러 곳에서 소개하고 있으나, 그 이후 회원 탈퇴를 구현하는 방법을 친절하게 정리한 글은 나오지 않았다.
그래서 내가 쓴다. 그 방법.
개발 환경(배경)
Firebase(Firebase Firestore, Firebase Authentication), SwiftUI로 만든 앱에서, 애플 로그인에 대한 회원 탈퇴 기능을 구현하는 방법에 대해 기술할 것이다.
이 글에서는 Firebase Cloud Function 기능을 이용한다.
SwiftUI로 만든 iOS Native 앱이 아닌, Firebase를 이용해 애플 로그인을 구현한 Android Native 앱이나, Flutter로 만든 앱, UIKit으로 만든 앱에 대해 회원 탈퇴를 구현하는 사람들도, 구현 과정은 거의 동일할 것이므로, 참고해도 좋을 것이다.
** Firebase Cloud Functions 기능을 이용하려면, Blaze 요금제로 업그레이드해야할 수 있다. 테스트 사용량 정도로는 요금이 청구되지 않을 것이니, 부담없이 업그레이드 하자. ^ㅁ^
1. 프로젝트에 Firebase Cloud Function 세팅하기
이미 애플 로그인이 구현되어 있다면, Firebase 프로젝트가 생성되어 있을 것이다.
따라서, Firebase 프로젝트가 이미 생성되어 있다고 간주하고 시작한다.
1-1. Firebase CLI 설치
Firebase CLI를 설치하고, Cloud Functions 기능을 사용하기 위해서는 우선 Node.js 환경이 필요하다.
nvm 등을 이용해 Node.js와 npm을 설치한 후에 시작하자. (Node 설치 방법은 이 게시글에서 설명하지 않음.)
$ npm install -g firebase-tools위 명령어로 npm을 이용해 Firebase CLI을 전역으로 설치해 주자.
1-2. Firebase 프로젝트 연결
$ firebase login을 실행하여 우선 Firebase CLI에서 로그인하자. (웹으로 리다이렉팅됨.)
그 후, 우선 프로젝트 폴더로 디렉토리를 이동하고, 해당 위치(프로젝트 디렉토리 위치)에서
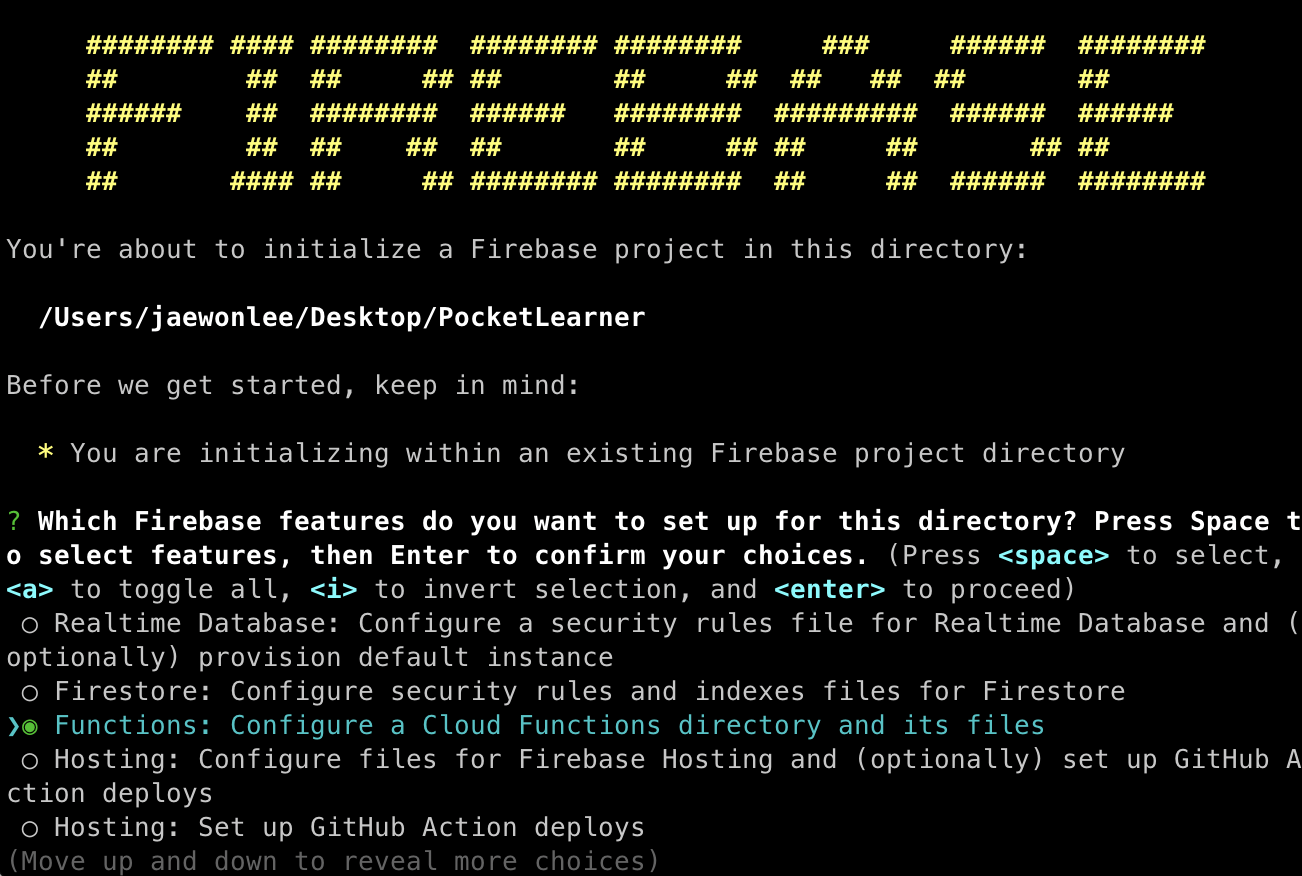
$ firebase init을 실행하면, 아래와 같은 화면이 뜬다.
화살표 키로 움직일 수 있으며, Functions를 Space로 select해주고, Enter로 선택해주면 된다.
그러면 연결된 계정의 Firebase에 있는 프로젝트를 연결할 수 있는데, 연결해주자.

Functions Setup에서 JavaScript/TypeScript 사용 여부, ESLint 사용 여부, npm으로 설치할 것인지 여부를 고를 수 있는데,
JavaScript - Yes - Yes 순으로 선택해 준다. (물론, TypeScript가 익숙하다거나 하면 알아서.. 이 글에선 JS로 진행.)
1-3. Cloud Functions 및 Admin SDK 모듈 import
위 단계까지 진행했다면, 프로젝트 폴더 내에 functions 폴더가 생겼을 것이다.
functions 폴더 내의 index.js 파일에 들어가 아래와 같은 코드를 작성해 주자.
// The Cloud Functions for Firebase SDK to create Cloud Functions and set up triggers.
const functions = require('firebase-functions');

// The Firebase Admin SDK to access Firestore.
const admin = require('firebase-admin');
admin.initializeApp();
1-4. JsonWebToken 모듈 설치
npm을 통해 jsonwebtoken 모듈을 설치해 주자.
(설치 위치는 functions 폴더 내에서.)
애플 로그인 회원 탈퇴를 위해, Token Revoke를 하려면 JWT를 이용해야 하기 때문에 이후 필요하다.
$ npm install jsonwebtoken
2. Cloud Function 작성하기
2-1. Apple Developer 사이트에서 AuthKey 파일 다운로드 및 프로젝트 파일 적용
https://developer.apple.com/account/resources/authkeys/list
에 들어가, Sign in with Apple 옵션을 포함한 AuthKey를 하나 생성해 준다.
어떻게 하는 지 모르겠다면 잘 정리된 아래 블로그 참고.
https://es1015.tistory.com/455
.p8 파일을 다운로드 했다면, functions 폴더에 살포시 넣어주면 된다.
2-2. 필수 모듈 import 및 앱 초기화 코드 작성
functions 폴더 내의 index.js 파일에 코드를 작성해 준다.
// The Cloud Functions for Firebase SDK to create Cloud Functions and triggers.
const {logger} = require("firebase-functions");
const {onRequest} = require("firebase-functions/v2/https");
const {onDocumentCreated} = require("firebase-functions/v2/firestore");

// The Firebase Admin SDK to access Firestore.
const {initializeApp} = require("firebase-admin/app");
const {getFirestore} = require("firebase-admin/firestore");

initializeApp();
2-3. JWT(JSON Web Tokens)를 return하는 함수 작성
Firebase를 이용한 애플 로그인을 시도할 때 ASAuthorizationAppleIDCredential 객체를 받아온다.
이 credential에는 authorizationCode 라는 데이터가 존재하는데, 이 authorizationCode 를 이용하여, Apple에 Rest API 통신을 해서 refresh token을 받아올 수 있다.
Rest API 통신을 하는 과정에서, JWT가 필요하므로, Firebase Cloud Function 쪽에서 JWT를 생성하는 함수를 하나 작성해 주자. (index.js에 작성하면 된다.)
(이를 위해 1-4. 가 필요했다.)
AuthKey_XXXXXXXXXX.p8 부분은 위에서 다운받은 파일명을,
iss: 'YOUR TEAM ID' 부분은 Apple Developer의 멤버십 세부 사항에서 확인하여 채우고,
sub: 'YOUR CLIENT ID' 는 등록된 앱의 Bundle Identifier (Bundle ID)를,
kid: 'YOUR KEY ID' 는 'AuthKey_XXXXXXXXXX.p8' 에서 XXXXXXXXXX 부분을 가져다 채우면 된다.
function makeJWT() {

  const jwt = require('jsonwebtoken')
  const fs = require('fs')

  // Path to download key file from developer.apple.com/account/resources/authkeys/list
  let privateKey = fs.readFileSync('AuthKey_XXXXXXXXXX.p8');

  //Sign with your team ID and key ID information.
  let token = jwt.sign({
  iss: 'YOUR TEAM ID',
  iat: Math.floor(Date.now() / 1000),
  exp: Math.floor(Date.now() / 1000) + 120,
  aud: 'https://appleid.apple.com',
  sub: 'YOUR CLIENT ID'

  }, privateKey, {
  algorithm: 'ES256',
  header: {
  alg: 'ES256',
  kid: 'YOUR KEY ID',
  } });

  return token;
}
2-4. Refresh Token 및 token을 이용해 auth 정보를 revoke하는 함수 작성
아래와 같은 함수를 작성한다.
API 요청을 보내 Refresh Token을 받아온다.
('YOUR CLIENT ID' 부분은 채워줄 것.)
exports.getRefreshToken = functions.https.onRequest(async (request, response) => {

    //import the module to use
    const axios = require('axios');
    const qs = require('qs')

    const code = request.query.code;
    const client_secret = makeJWT();

    let data = {
        'code': code,
        'client_id': 'YOUR CLIENT ID',
        'client_secret': client_secret,
        'grant_type': 'authorization_code'
    }

    return axios.post(`https://appleid.apple.com/auth/token`, qs.stringify(data), {
    headers: {
        'Content-Type': 'application/x-www-form-urlencoded'
    },
    })
    .then(async res => {
        const refresh_token = res.data.refresh_token;
        response.send(refresh_token);

    });

});
또한, 아래와 같은 함수를 작성해 준다.
위에서 받아온 Refresh Token을 이용해 Apple 측에 API 요청을 보내 계정 정보를 revoke시킨다.
(마찬가지로, 'YOUR CLIENT ID' 부분은 채워줄 것.)
exports.revokeToken = functions.https.onRequest( async (request, response) => {

  //import the module to use
  const axios = require('axios');
  const qs = require('qs');

  const refresh_token = request.query.refresh_token;
  const client_secret = makeJWT();

  let data = {
      'token': refresh_token,
      'client_id': 'YOUR CLIENT ID',
      'client_secret': client_secret,
      'token_type_hint': 'refresh_token'
  };

  return axios.post(`https://appleid.apple.com/auth/revoke`, qs.stringify(data), {
      headers: {
          'Content-Type': 'application/x-www-form-urlencoded'
      },
  })
  .then(async res => {
      console.log(res.data);
      response.send('Complete');
  });
});
2-5. 작성한 Cloud Function 코드를 Firebase 프로젝트에 적용
프로젝트 폴더의 functions 폴더로 위치를 옮겨, 아래와 같이 배포해주면 끝~!
$ firebase deploy --only functions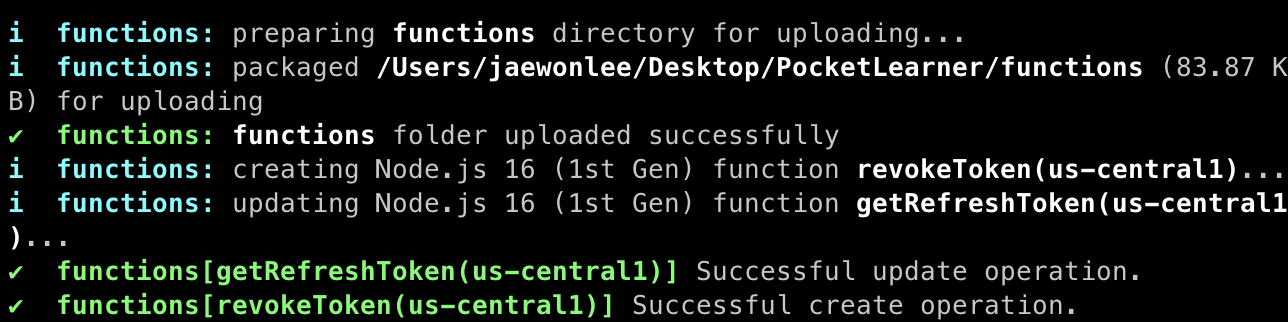
배포 이후, Firebase 프로젝트의 Functions 측에 가보면, 배포된 함수 getRefreshToken과 revokeToken을 볼 수 있다.
** 참고
만약, deploy 도중 eslint 어쩌고 하는 오류가 떴다면 아래 글을 참고하여 해결해볼 것.
52:29  error  Parsing error: Unexpected token =>

✖ 1 problem (1 error, 0 warnings)

npm ERR! code ELIFECYCLE
npm ERR! errno 1
npm ERR! functions@ lint: `eslint .`
npm ERR! Exit status 1
npm ERR!
npm ERR! Failed at the functions@ lint script.
npm ERR! This is probably not a problem with npm. There is likely additional logging output above.
또는 아래와 같은 오류가 떴다면,
Error: Failed to fetch Run service undefined아래처럼 최신 버전으로 재설치 후 실행해볼 것!
$ npm install -g firebase-tools --force
이외에도 여러 오류가 뜰 수는 있으나, 구글링하여 해결하길 바람.
2-*. index.js 파일에 작성한 모든 코드 정리 (참고용)
const functions = require("firebase-functions");

// The Cloud Functions for Firebase SDK to create Cloud Functions and triggers.
const { logger } = require("firebase-functions");
const { onRequest } = require("firebase-functions/v2/https");
const { onDocumentCreated } = require("firebase-functions/v2/firestore");

// The Firebase Admin SDK to access Firestore.
const { initializeApp } = require("firebase-admin/app");
const { getFirestore } = require("firebase-admin/firestore");

initializeApp();

function makeJWT() {
  const jwt = require("jsonwebtoken");
  const fs = require("fs");

  // Path to download key file from developer.apple.com/account/resources/authkeys/list
  let privateKey = fs.readFileSync("[AuthKey 파일명(.p8)]");

  //Sign with your team ID and key ID information.
  let token = jwt.sign(
    {
      iss: "[팀 ID]",
      iat: Math.floor(Date.now() / 1000),
      exp: Math.floor(Date.now() / 1000) + 120,
      aud: "https://appleid.apple.com",
      sub: "[클라이언트 ID]",
    },
    privateKey,
    {
      algorithm: "ES256",
      header: {
        alg: "ES256",
        kid: "[키 ID]",
      },
    }
  );

  return token;
}

exports.getRefreshToken = functions.https.onRequest(
  async (request, response) => {
    //import the module to use
    const axios = require("axios");
    const qs = require("qs");

    const code = request.query.code;
    const client_secret = makeJWT();

    let data = {
      code: code,
      client_id: "[클라이언트 ID]",
      client_secret: client_secret,
      grant_type: "authorization_code",
    };

    return axios
      .post(`https://appleid.apple.com/auth/token`, qs.stringify(data), {
        headers: {
          "Content-Type": "application/x-www-form-urlencoded",
        },
      })
      .then(async (res) => {
        const refresh_token = res.data.refresh_token;
        response.send(refresh_token);
      });
  }
);

exports.revokeToken = functions.https.onRequest(async (request, response) => {
  //import the module to use
  const axios = require("axios");
  const qs = require("qs");

  const refresh_token = request.query.refresh_token;
  const client_secret = makeJWT();

  let data = {
    token: refresh_token,
    client_id: "[클라이언트 ID]",
    client_secret: client_secret,
    token_type_hint: "refresh_token",
  };

  return axios
    .post(`https://appleid.apple.com/auth/revoke`, qs.stringify(data), {
      headers: {
        "Content-Type": "application/x-www-form-urlencoded",
      },
    })
    .then(async (res) => {
      console.log(res.data);
      response.send("Complete");
    });
});
3. iOS 앱 쪽 코드 작성 (Cloud Function 호출)
3-1. Apple ID Credential 객체에서 authorizationCode 추출
XCode(프로젝트 파일)로 돌아가 보자.
이미 Sign in with Apple(애플 로그인)을 앱 내에 구현했다면, ASAuthorizationAppleIDCredential 객체를 전달받아, Firebase Credential 객체를 initialize하고, Firebase Auth에 로그인하는 함수를 작성했을 것이다.
나의 경우 아래와 같이 작성되어 있었다.
func authenticate(credential: ASAuthorizationAppleIDCredential, failHandler : @escaping (String,String) -> Void ){
        // get Token
        guard let token = credential.identityToken else{
            print("Error with Firebase - Apple Login : GETTING TOKEN")
            failHandler("토큰 획득 실패!","다시 시도해주세요")
            return
        }

        // Token String
        guard let tokenString = String(data: token, encoding: .utf8) else{
            print("Error with Firebase - Apple Login : In Token Parsing to String")
            failHandler("토큰 파싱 실패!","다시 시도해주세요")
            return
        }

        // Initialize a Firebase credential.
        let firebaseCredential = OAuthProvider.credential(withProviderID: "apple.com", idToken: tokenString, rawNonce: nonce)
        // Sign in with Firebase.
        Auth.auth().signIn(with: firebaseCredential) { (result, err) in
        // ...
    }
현재 이 코드에서, ASAuthorizationAppleIDCredential 객체는 credential 이라는 parameter로 넘겨받고 있는 것을 알 수 있다.
아래와 같이 ASAuthorizationAppleIDCredential 객체에서 authorizationCode를 추출하여 저장해 두자.
// authorization Code to Unregister! => get user authorizationCode when login.
if let authorizationCode = credential.authorizationCode,
   let codeString = String(data: authorizationCode, encoding: .utf8) {
   print(codeString)
}
3-2. authorizationCode를 이용해 통신 후 RefreshToken 획득 및 저장.
바로 위 3-1에서 작성한 코드를, 아래와 같이 변경하자.
Apple 로그인 시, authorizationCode를 이용해 통신 후 받아온 RefreshToken을 저장하는 코드다.
아래 예시에서는 UserDefaults에 refreshToken을 저장했지만, 보안 상 좋지 않으므로, iCloud Keychain을 이용해 저장할 수 있다면 그렇게 하는 쪽이 더 좋다.
URL 쪽의 YOUR-URL 는, 2-5에서 확인한 Firebase 프로젝트의 Functions에서 확인하여 알맞게 채워주자.
// authorization Code to Unregister! => get user authorizationCode when login.
if let authorizationCode = credential.authorizationCode, let codeString = String(data: authorizationCode, encoding: .utf8) {
    let url = URL(string: "https://YOUR-URL.cloudfunctions.net/getRefreshToken?code=\(codeString)".addingPercentEncoding(withAllowedCharacters: .urlQueryAllowed) ?? "https://apple.com")!
    let task = URLSession.shared.dataTask(with: url) {(data, response, error) in
        if let data = data {
            let refreshToken = String(data: data, encoding: .utf8) ?? ""
            print(refreshToken)
            UserDefaults.standard.set(refreshToken, forKey: "refreshToken")
            UserDefaults.standard.synchronize()
        }
    }
    task.resume()
}
3-3. 회원탈퇴 기능 코드 작성
드디어 마지막이다.
아래와 같은 함수를 작성하고, 필요한 곳에서 호출하여 이용하면 된다.
주석 부분에 DB에서 지워야 할 유저 정보를 모두 삭제하는 코드를 작성하고, 앱을 종료하거나 맨 처음 페이지로 돌아가는 등의 코드를 추가로 작성하면 될 듯 하다.
func removeAccount() {
  let token = UserDefaults.standard.string(forKey: "refreshToken")

  if let token = token {
      let url = URL(string: "https://YOUR-URL.cloudfunctions.net/revokeToken?refresh_token=\(token)".addingPercentEncoding(withAllowedCharacters: .urlQueryAllowed) ?? "https://apple.com")!

      let task = URLSession.shared.dataTask(with: url) {(data, response, error) in
        guard data != nil else { return }
      }
      task.resume()
  }
  // Delete other information from the database...
  // Sign out on FirebaseAuth
    do {
        try Auth.auth().signOut()
    } catch let signOutError as NSError {
        print("Error signing out: %@", signOutError)
    }
}
Reference
https://developer.apple.com/documentation/sign_in_with_apple/revoke_tokens
https://developer.apple.com/documentation/sign_in_with_apple/generate_and_validate_tokens
https://github.com/jooyoungho/apple-token-revoke-in-firebase
https://firebase.google.com/docs/functions/get-started?authuser=0&hl=ko
https://velog.io/@givepro91/jjo2cyus